Originally published December 2011 and most recently updated July 22, 2024 to try to keep up with the latest iterations of Lightroom (followers have been making good suggestions and asking germane questions.) Also a suggestion from Rob Sylvan of Lightroomers.com.
www.PaoloPettigiani.com
Used by written permission. No third-party use.
Adobe Photoshop Lightroom Classic — more commonly known simply as “Lightroom” — is an amazingly intuitive program to use. That is why I use it for teaching in our workshops. There are some recommended settings for Lightroom that may make your life easier in the long run. While this is written for those who are using the latest Classic version, the same principles may be applied to earlier ones. Please note that I will sometimes refer to Lightroom as LR.
These are suggestions that work for us. Others may find settings that work better for them. And in another blog, I have written about maintaining the health of your catalog in Care and Feeding of Your Lightroom Catalog.
Many who come to Barefoot Contessa Photo Adventures (BCPA) workshops call or e-mail in a panic, because they have bought a new computer, or the old one crashed, and they lost their setup, Margo’s Tweaks, and other presets. The following is what works well for me. It may serve as a useful guideline for others.
Except for a very few instances, Mac’s CMD and PC’s CTRL do the same thing, so if you see CMD (Command), you know I am referring to you Mac users, and for CTRL (Control), PCers. Check out the examples, then the explanations below them. That said, I am on PCs, so if you find Mac differences, please let me know through the comments on this blog!
Please note that if there are “past” dates in the screen shots, the principles remain the same. AND, in due course, I will update the screen shots in my non-existent “free” time! I will also be making more updates to this blog. Meanwhile, enjoy!
Catalog Settings
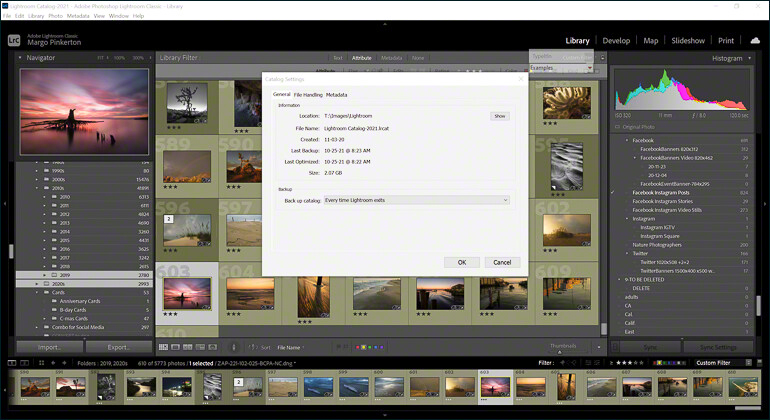
Start by going to your Catalog Settings:
- Lightroom > Catalog Settings for Mac
- Edit > Catalog Settings for PC
and copy the settings below as noted in each screen capture.
GENERAL
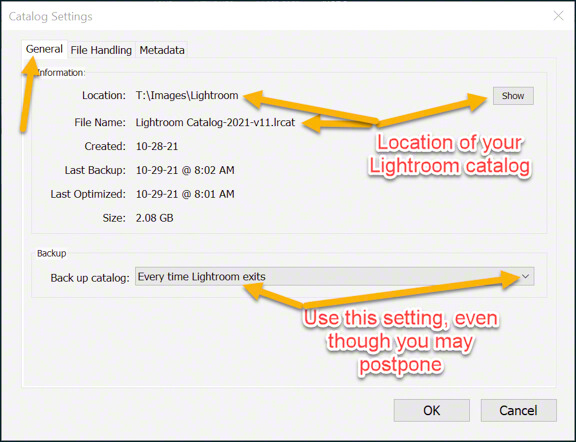
- Note the Location of your LR Catalog – If you wish to move it, copy the current location path (T:\Images\Lightroom in my case), as you can change that.
- For example, I keep our catalog (yes, only one catalog) on an external hard drive backed up in what I like to call “multuplicate,” thus avoiding switching back and forth between computers, whether home, travel, or new.
- Backing up your catalog is critical. I back ours at least once a week, when exiting Lightroom, but I set the default to Every time Lightroom exits as a reminder for when I have been doing a ton of work on images. Don’t forget to delete all but three of the most recent backup copies … found usually in Lightroom > Backups; otherwise search! That said, I make sure my backups are on a different drive from the catalog. That way, when (never IF) Lightroom or the computer fails, you are not skunked. Again, check out the blog on Care and Feeding of Your Lightroom Catalog as well as Backup, Backup, Backup.
- If you want to know how much room your backups take, check out the free space on your computer, delete all but the most recent three of your backups, and check again. Remember, your computer needs free space to make all of its programs, now called “apps”) to work.
FILE HANDLING
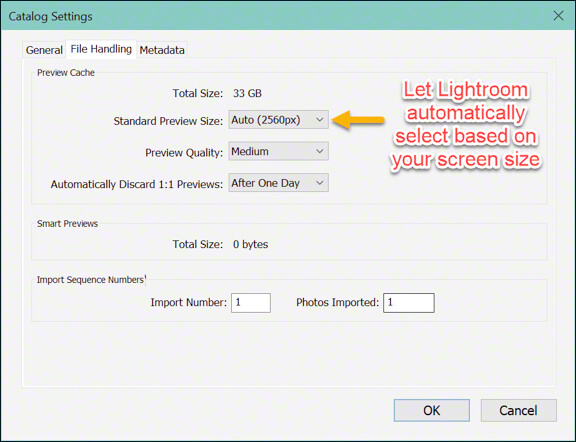
- I recommend starting with the Adobe Lightroom Classic defaults along with my suggested settings, then make changes, sometimes for recommended reasons, and at other times for personal taste.
- For Adobe’s recommendations, please read theirs on Optimize Performance. After all, they wrote and continually update the program!
- 1:1 Previews can take up a lot of room on your hard drive, so unless you are working extensively on a few images, automatically discard those previews After One Day.
METADATA
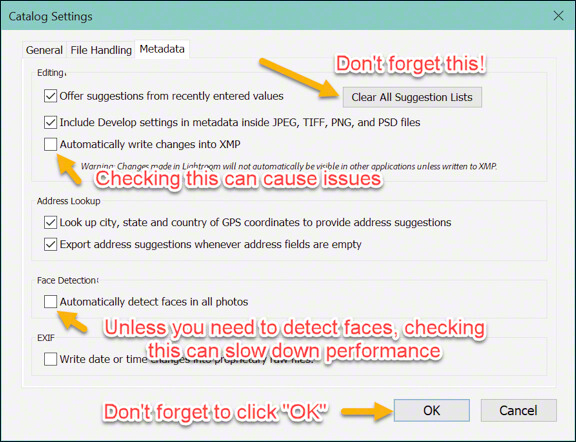
- I do not Automatically write changes into XMP. Why?
- If you have a number of images selected by mistake and give, say, a 3* rating to what you think is one image, not only will the 3* be applied to all those selected images, the 3* will be saved to them, as well. If you go on to other tasks, you may no longer able to undo what you have done (CMD-z or CTRL-z).
- That said, I do save my changes to the files themselves, but more about that later. Now press OK or Confirm (for Macs.)
Preferences
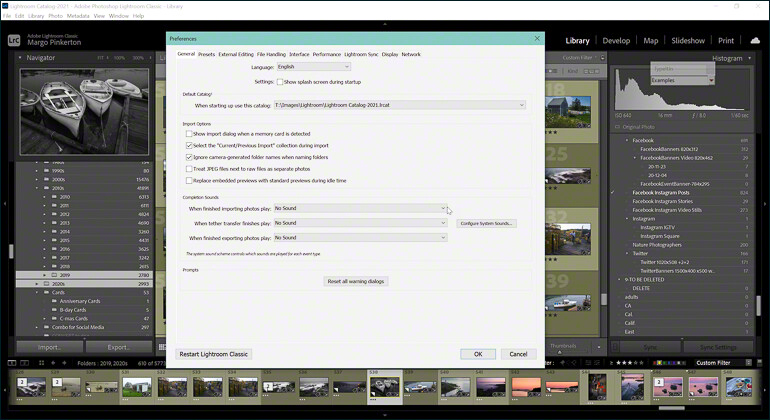
Now, go to your Preferences:
- Lightroom > Preferences for Mac
- Edit > Preferences for PC
and copy the settings below as noted in each screen capture.
GENERAL
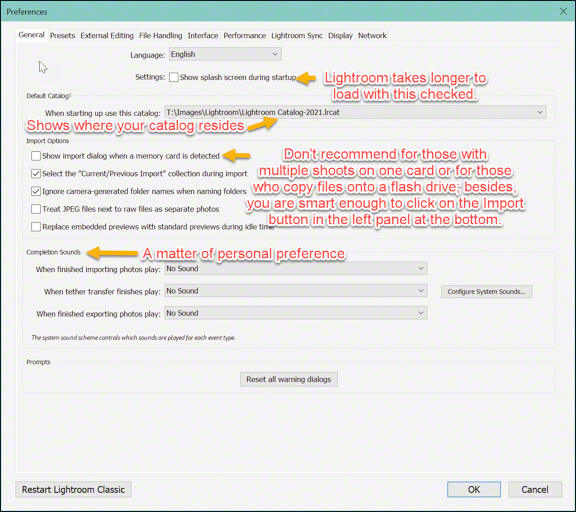
- Show splash screen… is not needed; just wastes time.
- I don’t check off Show import dialog, because anything plugged into your computer can initiate start of LR or LR import dialogue, including that jump drive that contains work documents or those photographs for your Great Aunt Minnie.
- Completion Sounds are a matter of personal preference, as are many of the items in the other sections.
PRESETS
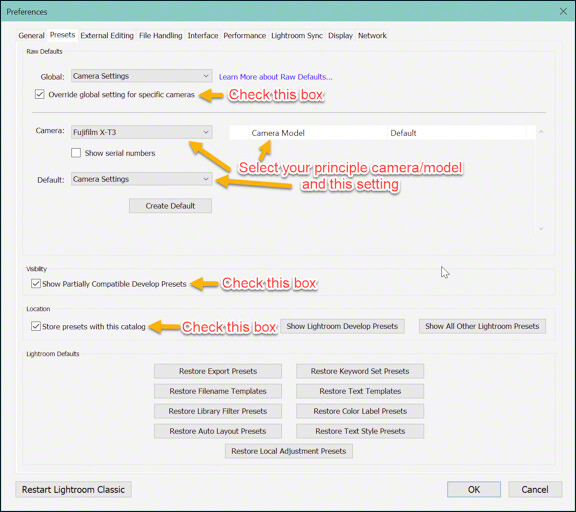
- Make sure Camera Settings is selected beside Global, then check the Override global setting for specific camera, then …
- Select your rinciple camera/model and Default to Camera Settings.
- Check the next two boxes.
This next section is both for those who are new to LR and for seasoned users.
PRESETS STORE WITH THIS CATALOG PREP
- Moving your catalog or changing computers will not lose presets IF you Store presets with this catalog.
- Follow the examples in the figure below in order, but FIRST:
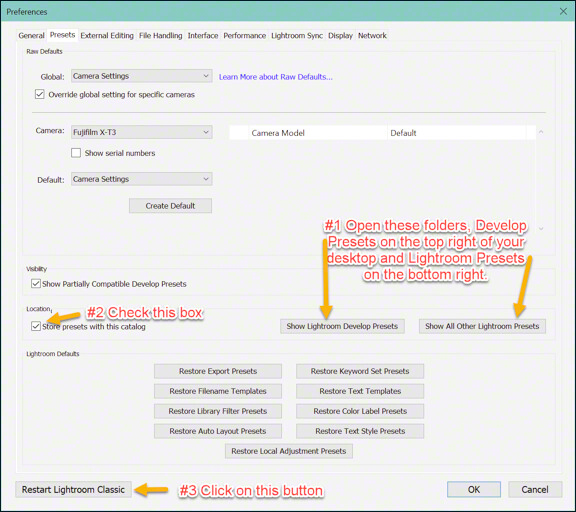
- For those who have already been using LR and wish to keep their own presets … BEFORE checking Store presets with this catalog, click both Show Lightroom Presets buttons (#1) to open them and in both cases, open the highlighted folders within them; this is the first step to storing those presets with the catalog itself.
- Leave those folders open, but drag those Show Lightroom Develop Presets and Show All Other Lightroom Presets windows to the upper and lower left respectively on your desktop, substituting “left” for the “right” (screen capture is for new users) in the figure above; then reduce them so that you can find them later when you/we need to return to them.
- Return to Lightroom’s preferences, and check off #2, Store presets with this catalog.
- Restart the program.
- PC users will now click Restart Lightroom Classic (#3) at lower left of window, and wait for Lightroom Classic to reopen.
- For Mac users, the nice Restart Lightroom Classic button on any of the Preferences tabs does not exist on the macOS version. You have to remember to restart the program the Mac way – CMD-Q, then start the program again to activate any changes. These are critical points for Mac users.
- For those who are new to Lightroom and do not yet have any presets … CHECK Store presets with this catalog, and as above, restart Lightroom
- PC users will now Click Restart Lightroom Classic (#3) at lower left of window, and wait for Lightroom Classic to reopen.
- For Mac users, the nice Restart Lightroom Classic button on any of the Preferences tabs does not exist on the macOS version. You have to remember to restart the program the Mac way – CMD-Q, then start the program again to activate any changes. These are critical points for Mac users.
- Click both Show Lightroom Develop Presets and Show All Other Lightroom Presets buttons (#1) to open them and in both cases, open the highlighted folders within them; this is the first step to storing those presets with the catalog itself.
- Leave those folders open, but drag those windows respectively to the upper right and lower right of your desktop as noted in the figure above; then reduce them so that you can find them later when you/we need to return to them.
PRESETS POPULATING for BCPA LIGHTROOM CLASSIC WORKSHOP PARTICIPANTS
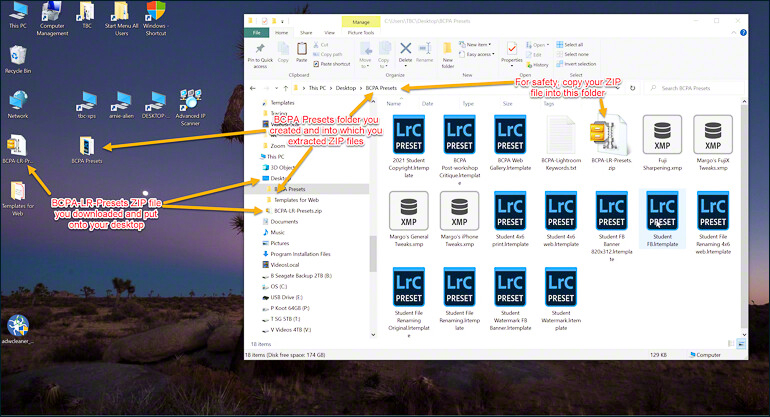
For Develop Presets …
- Remember the BCPA Presets ZIP file you downloaded and extracted into a BCPA LR folder on your desktop? Open and drag it to the left area of your desktop.
- Now “open” the Develop Presets folder that you reduced a short time ago and drag it to the right area of your desktop, as shown in the figure below.
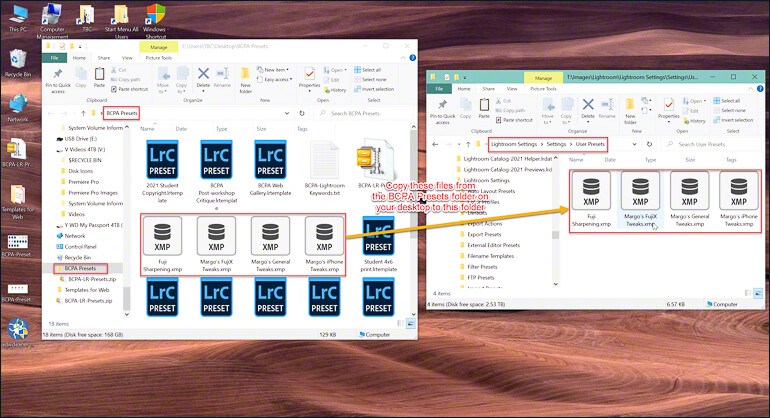
- As you copy certain files over, please COPY and PASTE, not drag and drop, because some computers MOVE instead of PASTE; you want the presets saved in your BCPA LR folder as a backup
- Open that Settings folder on the right, then the User Presets one inside.
- For those who already have presets they want to store with their catalog, bring the Develop presets folder back up that you reduced above.
- Copy and Paste the contents to the folder at the right.
- Now close out that left window that contained your old Develop presets.
- Close out that Lightroom Settings > Settings > User Presets window on the right. Yes, close it out.
For Export Templates …
- Bring up the Lightroom Settings folder that you opened and reduced earlier; drag it to the right side of your desktop, as shown in the figure below…
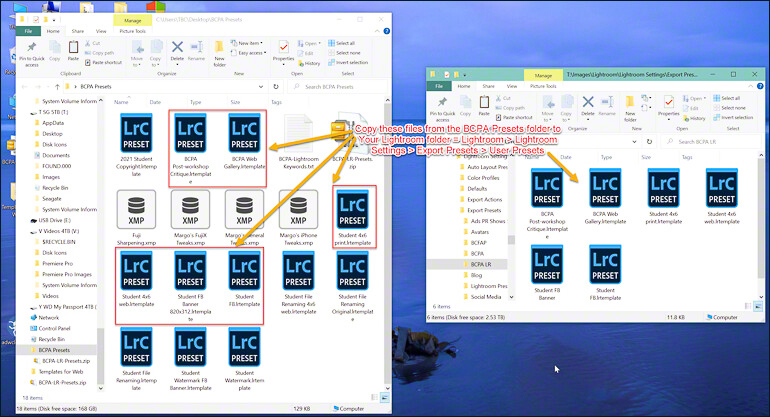
- Open the Export Presets folder (do not confuse this with the Export Actions folder), then the User Presets one inside.
- For those who already have presets they want to store with their catalog, bring Other presets folder back up that you reduced above and Copy and Paste, but for new users …
- Match the folder name on the left to the one on the right and Copy and Paste the following from the left to the folder to the one on the right.
- BCPA Post-workshop Critique.lrtemplate
- BCPA Web Gallery.lrtemplate
- Student 4×6 print.lrtemplate
- Student 4×6 web.lrtemplate
- Student FB Banner 820×312
- Student FB.lrtemplate
- You will be following the same procedure for the following presets and templates.
- Return to your Lightroom Settings as before..
For Filename Templates …
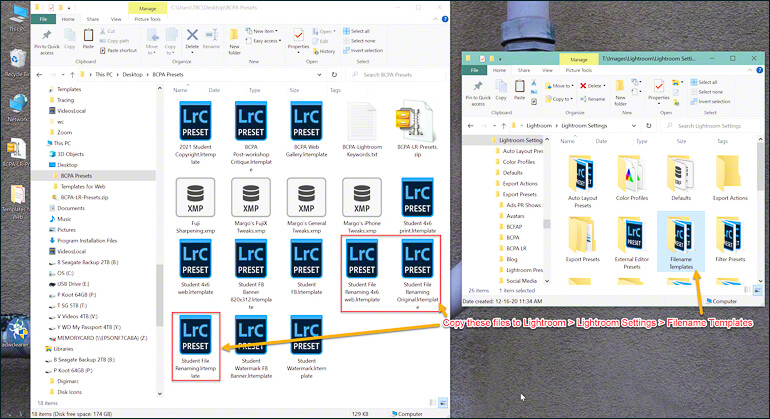
- Open the Filename Templates folder (no sub-folder for User Presets here).
- Copy the following and Paste them over into the open Filename Templates.
- Student File Renaming 4×6 web.lrtemplate
- Student File Renaming Original.lrtemplate
- Student File Renaming.lrtemplate
- Return to Lightroom Settings as before.
For Metadata (Copyright) Templates …
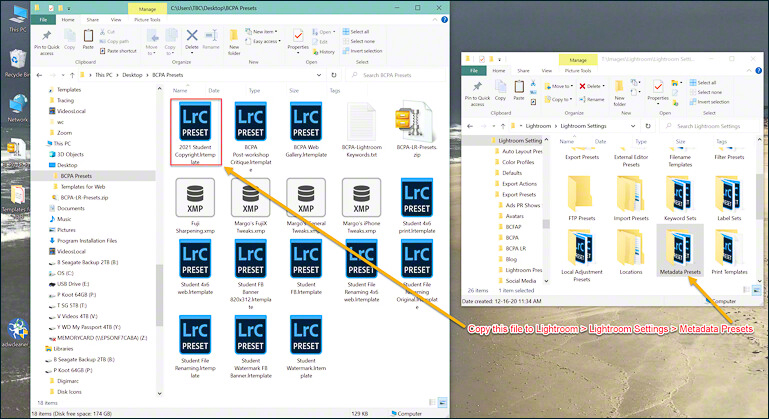
- Open the Metadata Templates folder (no sub-folder for User Presets here). Remember, copyright notices are part of metadata if you add them.
- Copy and paste Student Copyright.lrtemplate into the open folder on the right.
- Again, return to Lightroom Settings.
For Watermarks (note plural) Templates …
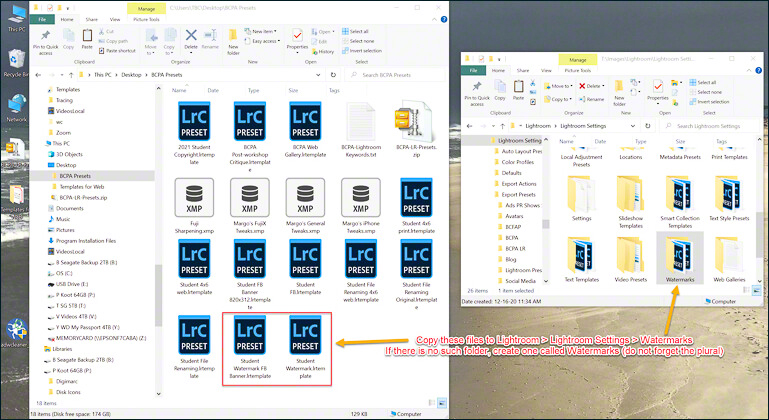
- Open the Watermarks folder; if there isn’t one, create one, making sure that the “W” is capitalized and that it ends with an “s” as in Watermarks.
- Copy and paste Student Watermark.lrtemplate into the open folder on the right.
- Now, close Lightroom (CTRL-Q or CMD-Q), and restart it.
Now, close out all those windows, and Restart Lightroom Classic, then return to your Preferences:
 Lightroom > Preferences for Mac
- Edit > Preferences for PC
EXTERNAL EDITING
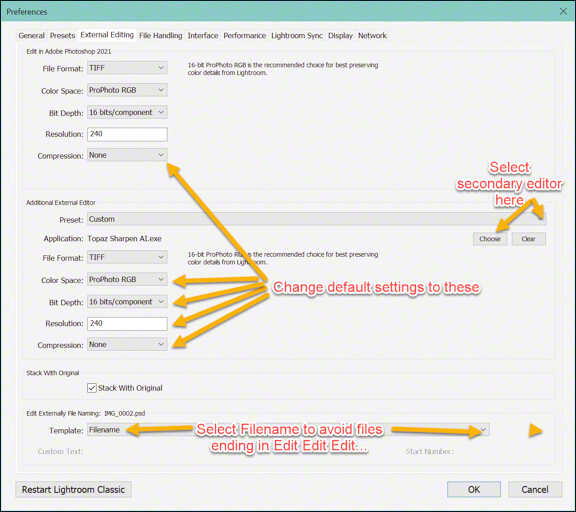
- My philosophy is that with the amazing dSLR and mirrorless cameras that many of us have, we want to maximize the digital image information and potential available to us. Again, we can downsize, but once downsized, we can never go back up. With that in mind, be sure that both sections match unless you are a newspaper or wedding photographer who needs that instant delivery only achieved by jpg/jpeg files.
- Editing in another program requires saving the file with another extension. File Format of TIFF/TIF or PSD files provide the highest quality.
- It should be noted here that ProPhoto RGB is the default Color Space for Lightroom. If I am going to go to Topaz Sharpen AI, nik Silver Efex Pro, or AutoPano Pro, for example, I want to stick with the same color profile. Remember, you can always convert to a lesser profile, but you can never go back up!
- Similarly, you want the highest Bit Depth available.
- Also, since a Resolution of 240 is the default for Lightroom, I recommend sticking with that. On output (exporting), you can choose 76, 96, 240, 300, or 360, etc.
- With the sizes of today’s hard drives, there is no need for Compression.
- Lightroom Classic defaults to using your Photoshop for external editing, since it is included in your subscription, which is why it is not listed. I occasionally use other programs, and I have selected oneof them program for that.
- Under Edit Externally File Naming, I strongly recommend you just use the regular file name. Otherwise, Edit Edit Edit will potentially appended to your file name that it could take you around the world in way more than 80 days! The extension — tif/tiff, jpg/jpeg, psd, etc. will let you know that you have edited it!
FILE HANDLING
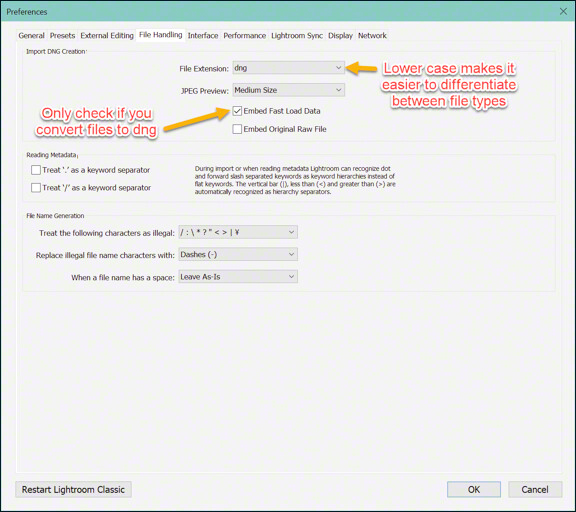
- To DNG or not to DNG, that is the photographer’s question.
- I convert my raw files to dng (digital negative) on import. It negates the need for what for many of us are those pesky xmp (sidecar) files.
- It also enables us to take advantage of the “Embed Fast Load Data” feature.
- “Embed Fast Load Data” stores the ACR (Adobe Camera Raw) in the dng file, so the previews are read more quickly.
- If you prefer to stick to your camera’s native raw file, then uncheck the “Embed Fast Load Data” box.
- But what about that lower-case dng extension above? If you click on the drop-down arrow, you will see DNG (all caps) is an option. Remember that ALL CAPS IS ACTUALLY HARDER TO READ THAN Upper and Lower Case Letters. I worked for a well-known publishing house many eons ago, and I learned that quickly. That lower-case extension will help you separate it from your file name. And in a list, it is easier to separate dng, nef, cr2, tif, psd, and jpg compared to trying to separate DNG, NEF, CR2, TIF, PSD, JPG, etc.
- Why don’t I embed the original raw file into the dng file? Most fellow pros I know do not either. Your dng file is now your raw file. Unless you are using your camera manufacturers’ imaging program, usually abominably and excrutiatingly painfully slow, most of us don’t need our nef, cr2, raf, etc. original raw file that contains extra information so that you can use their imaging software.
- I find that Medium Size works just fine for “JPEG Preview” which is the Lightroom default.
INTERFACE
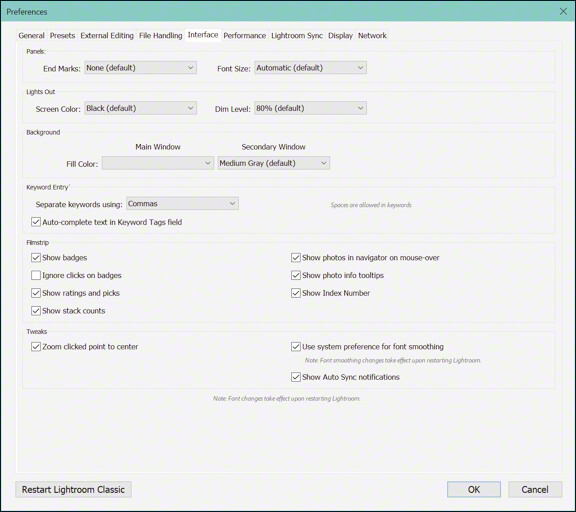
- You will do just fine with the Lightroom defaults in this tab.
- If your defaults are different from what is shown above, I may have changed mine a long time ago and found it works for me.
PERFORMANCE
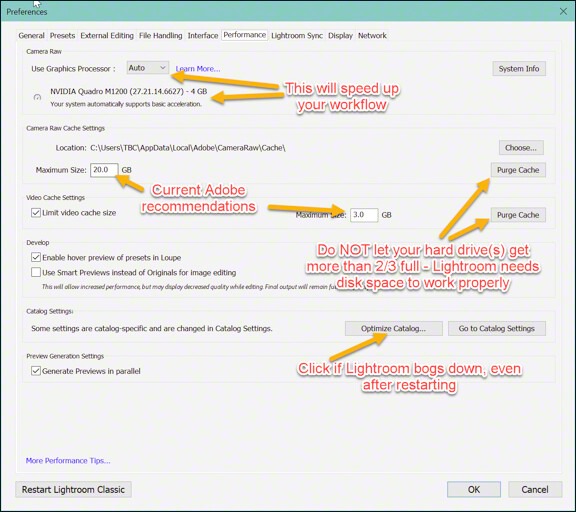
- I check the Use Graphics Processor box. This considerably speeds Lightroom up. BUT…and this is a Big BUT…
- If you have an older computer, be sure to check the Learn More … blue link in that tab to make sure this feature is appropriate for your computer; if you don’t, Lightroom may keep crashing on you.
- Be sure to note the Camera Raw Cache Settings with the button to the right; if Lightroom gets sluggish, you may want to Purge Cache to speed things up.
- As of April 2021, Victoria Bampton, The Lightroom Queen, recommends a Maximum Size cache of 5-10GB — and note that this is different from the screen shot above. 3GB is fine for your video cache. Some believe that it should be set to 20% of the computer’s free space. I am checking with Victoria for updated information on this.
- Click on the More Performance Tips... link for Adobe’s recommendations.
- Under Catalog Settings you will see two useful buttons, one to Optimize Catalog when it gets sluggish and another, Go to Catalog Settings that has already been addressed above.
LIGHTROOM SYNC
DISPLAY
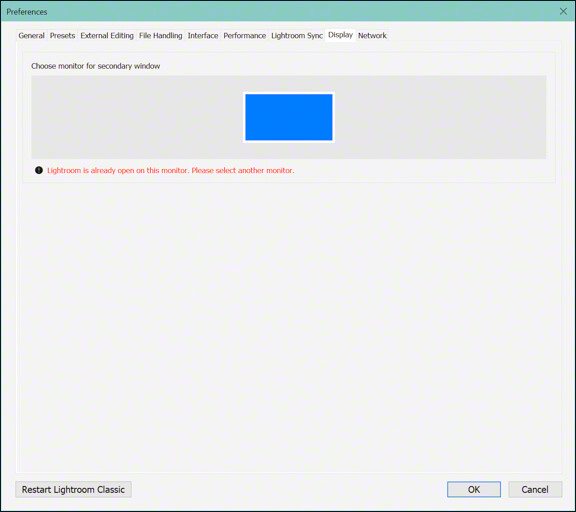
- This section is for those who work with one or more monitor displays
NETWORK
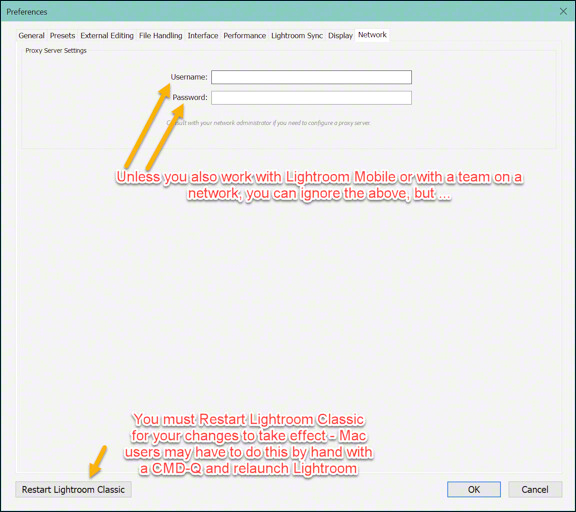
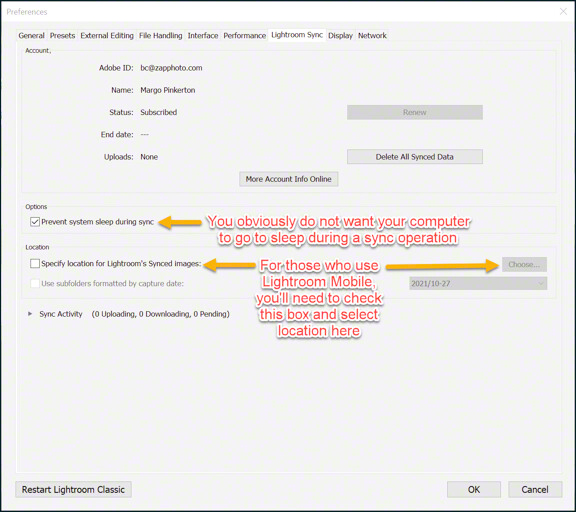
- Because I am often in locations with iffy, slow, or non-existent connections, I do not use the cloud-based Lightroom CC (very different from Lightroom Classic, so do not get them confused), Lightroom Mobile, nor do I work on a Lightroom Network with a team. For these reasons, I ignore the final two tab sections.
- If you do, however, there is plenty of information through Julianne Kost, one of the Lightroom developers and Adobe Systems’ Principal Digital Imaging Evangelist, or Victoria Bampton, The Lightroom Queen, an Adobe Community Professional & Certified Expert.
BACKUP, BACKUP, BACKUP
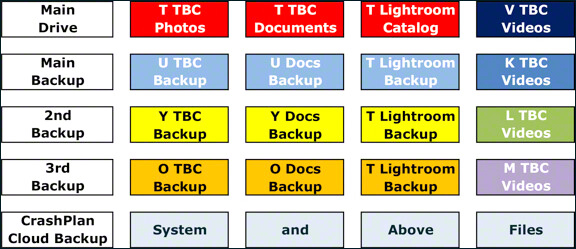
- And if, like us, you actually store your catalog on an external hard drive, backed up, of course (see Backup, Backup, Backup), on the road, you plug the HD into your laptop, and at home, into your main computer.
Again, whenever you modify Catalog Settings or Preferences, it is critical to restart Lightroom, so that the new settings will “take.”
Ta-DAAA, your Lightroom Classic is pretty much set up and ready to go. Now, on to the fun stuff and learning as much as you can about this amazing program. I periodically run Lightroom workshops, so check out the BCPA calendar. As with any learning curve, it can start out slow, then accelerate up into the stratosphere on a parabolic curve. The more you learn, the more tools you gain to learn more.
If you enjoy our blog(s) …
Please SUBSCRIBE. It’s easy to do by clicking on the appropriate link at the top of the right column.
Comments on the blog are always encouraged and welcome.
I also hope you will LIKE this and SHARE this blog with those interested in photography by clicking on the buttons below. And please check out these links:
- Barefoot Contessa Photo Adventures Website
- Instagram (I have found that there are more ads than links to people whom I follow, so I concentrate on Facebook above.)
- YouTube
Margo, I know that ProPhoto RGB is the widest gamut color space, but my Nikon D700 only offers sRGB and Adobe RGB. Since you can’t convert to the higher gamut, is there a reason to choose Prophoto for external editing?
A perhaps related question: a colleague in my master class group suggested that I update the Nikon firmware for my D700, which might add ProPhoto RGB as an option. You’ve never mentioned upgrading the firmware; is that something you recommend, and might it add ProPhoto?
Dave, would welcome your comments on that too!
Nat
Nat,
Excellent question. I use ProPhoto RGB, because that is the native color space for Lightroom, and I suspect it won’t be long before our cameras catch up. Meanwhile, it keeps things consistent in my workflow. No point exporting into, say, CS5 as Adobe RGB 1998 or sRGB, then bringing it back into ProPhoto RGB.
As to upgrading firmware, it is something everyone should do. You can sign up for announcements of new firmware releases with your camera manufacturer. As to what any new releases contain, I do not know. I suspect that it will be a new model of camera with an even better sensor that will determine ProPhoto RGB, and not firmware.
Take care, and thanks for writing,
TBC
Nat:
You should always have the most recent firmware for your camera loaded. In the case of the D700, your firmware should be version 1.02. Go to this site and you can see what was changed in this release: http://support.nikonusa.com/app/answers/detail/a_id/16657/~/d700-firmware%3A-a%2Fb-1.02. While it is possible to expand the color space through firmware, it is more likely, as Margo stated, that this will happen sometime in the future with a new camera model. It was not made part of the Nikon D4 that was just released, so there may be issues related to sensor capabillity that doesn’t yet allow that color space. Another possibility is that ProPhoto needs 16 bit images in order to avoid possible posterization and jpegs can only be 8 bit. As we all know, the image we see on the camera’s LCD is a jpeg version of the captured image, so using ProPhoto RGB as the color space for the LCD image could appear very badly if rendered with that color space. Best wishes, Dave
Thanks, Dave, for your always thoughtful input. And I’m glad you reinforced the need to keep your camera’s firmware always current.
Take care,
TBC
Thanks, Margo, for the LR set up information as it made me review all of my settings. Like Dave, I wondered about the ppi setting; mine is 300.
I do recommend backing up LR every time you exit the application. I had two hard drives fail last month and was very glad that all of my information was backed up. My images are stored on external hard drives, which are backed up to other external hard drives each week. The Lightroom catalogue is located on one of the external hard drives. I have thought about making an additional backup of the catalogue to Dropbox but have not done that yet.
The only other comment I would add has to do with printing from LR. First one needs to calibrate the monitor. Then I find that the exposure needs to be increased by .5 to 1.5 stops. Getting the correct exposure can be a bit daunting. I use Museo paper which is expensive and have found that I can use the thin interleaf as a test for exposure without using the real photo paper. Epson and HP also make presentation paper which is useful for trial purposes. If others use a different technique or different paper, I would love to hear about it.
You are welcome, George. I am so glad that you got everything straightened out after that last drive disaster. Fortunately, you had already been really good about backups which stood you in really good stead.
Regarding backups, I always backup the catalog when I create new presets or virtual copies. Otherwise, the fact that I always save any work right away to the image file itself is a backup of its own. Personally, I don’t care about the history, as long as the end results are there. But that is a personal preference, and backing up more rather than less will never be a bad thing. Better safe than sorry, as the old saying goes.
As to calibrating your monitor, it is something everyone should do, and not just for printing. Those International standards help make sure that what you see on your calibrated screen is what others will see on their screens … as long as they have calibrated their monitors, too.
Take care, and great tip about the thin interleaf as a test.
TBC
Margo:
As usual, your blog is very informational and useful. I have a question for you on a couple of your preferences.
With regard to Import Options, is there a reason to not check the box to ignore camera-generated folder names? My experience is that these folder names are of no value when creating an image organization hierarchy.
The other question relates to resolution. You have set resolution at 360 ppi for export to Photoshop and AutoPano Pro. Obviously, there is no “right” answer for this, but I am curious as to how you arrived at this resolution. Some believe that it should be set at 240 ppi, which is the “native” resolution used by Lightroom. Others believe it should be set at a resolution that relates to the printer being used. Printers have “native” resolutions. For example, it is 720 ppi for the Epson R2400, 360 ppi for the Epson 3800, and 300 ppi for the HP B9180. Sending an image to one of these printers at a resolution different than the native resolution for that printer works, but the printer driver will resample the image to the native resolution. Resampling in such cases can introduce unwanted artifacts to the final print. What are your thoughts? Thanks as always, Dave
Interesting questions and comments, as always, Dave.
Some things are really up to the way the individual photographer handles his/her workflow, but your comment on the camera-generated folder names merits a revision of the blog. Since I never use those folders, I forget they exist, which is not good for those who do use them.
I have always used 360 ppi as my default, Yes, Lightroom’s native resolution is 240 ppi, but when we are processing images in another program, they are usually destined for printing.
Rightly or wrongly, I have always used the 360 ppi resolution for our R2400, and when we print on our friend’s 7800, he also recommends using that 360 ppi resolution. He, like you, has done workshops with Sexton and others, and his own prints have been in at least one museum and several exhibitions.
You are a techie person, and while I am pretty computer savvy, I do not consider myself a techie at your level. All I can say is that we know what works in the final product for us with our printers and ICC profiles, and for whatever reason, we have not found any unwanted artifacts. I cannot tell you why not. But those reading your comments may decide that the 240 ppi setting is more appropriate for them. Whatever each person uses, I would suggest running some comparison tests to see what works best for each individual.
Meanwhile, I will do some research and comment back here.
Again, thanks for your always-thoughtful comments.
Take care,
TBC
Thanks Margo. Given the great strides in resampling algorithms the last few years, the concern about creating unwanted artifacts when resampling at other than the native resolution (or integer multiples thereof) may not be the issue it once was. Thanks for being so generous with your knowledge and experience. It has certainly improved my photography. Best wishes, Dave
Dave,
Thank YOU! You do a lot of research, so I could never dismiss your input. In fact, I have already adjusted the blog based on your input.
And it is always fun shooting with you, whether just us three or in a workshop situation. We love watching your work grow. It’s been, what, five years now?
Take care,
TBC
It was October 2007 when I attended my first workshop with you and Arnie in New England, and February 2012 in Costa Rica will be workshop number 5, and counting!
OK, Dave, four years, but five autumns! Glad you’re still counting!
Take care,
TBC